Accounts Payable
Welcome to the New World ERP Accounts Payable Processing online guide. This document will guide you through both the setup and processing aspects of Accounts Payable Processing. It is divided into two sections, System Administration and End User Processing.
System Administration. This section focuses on the setup components necessary to utilize the Accounts Payable Processing module within New World ERP. This will include detailed information on master files that must be set up such as Sales Tax Codes and Invoice Terms. This guide will also include the security settings which will be utilized to enable workflow and tailor user options to your needs.
End User Processing. This section describes the steps, workflow, and options available in Accounts Payable Processing to the end-user. It will guide you through the process from Invoice Entry to Payment Processing. Included in the section will be a guide to the standard reports available in the software.
This document is available in Microsoft Word format to allow for customization to your organization’s particular needs and procedures.
System Administrator
Validation Sets
There are multiple validation sets used in the Accounts Payable module. Some need to be set up in order to perform the next steps in the general setup process.
- #22 Check Form Type – A separate entry will need to be added to this validation set for each printed check format to be used. If only one AP check layout is required, an AP Check value is typically created.
- #24 Name Suffix – These suffixes are available for selection when creating vendors or, when entering vendor information on the Temporary Vendor method of invoice entry.
- #29 Hold Payment Reason – These reasons are available for selection during invoice entry. The application will not allow a payment to be created for any invoice that has a hold payment reason attributed to it. The hold payment reason must be removed before the invoice will be eligible to be paid. Some common hold payment reasons are Department Requested Hold, Awaiting W9 , and Disputed Invoice.
- #30 Unit of Measure – These units of measure are used when entering the detail items onto an invoice. Some common units of measure are Each, Case, Box, Gallon, Ton, Pound, etc.,
- #32 Positive Pay Format – A separate entry will need to be added to this validation set for each positive pay file format that is to be used.
- #38 Employee – Employees should be entered in this validation set if the organization has not licensed the Human Resources application and intends to use the Receipt of Goods module. This will enable Receipt of Goods Shippers to be attributed to the employee that actually took possession of the respective goods or, services.
- #45 ACH File Format – A separate entry will have to be added to this validation set for each ACH file format that will be used.
- #258 AP Payment Sort Group – These groups are available for selection during invoice entry. When checks are printed, all the checks for invoices attributed to a particular group will print together. Some common payment sort groups are Employee and Department Return.
- #239 “Request for Payment” Form Type – This validation set dictates the options that are available for selection when setting the request for payment form type in Company FM Settings. There is only one standard request for payment form type, so the common value is Standard.
- #244 Receipt of Goods Adjustment Reason – These reasons are available for selection when making adjustments to items on receipt of goods shippers. Some common reasons are Correction and Entry Error.
- #329 Void Payment Reason – These reasons are available to be selected when voiding a check or, EFT payment. Some common void payment reasons are Wrong Vendor, Duplicate, Stale Dated, and Wrong Amount.
- #349 Void Invoice Reason – These reasons are available to be selected when voiding an invoice. Some common void invoice reasons are Wrong Vendor, Duplicate, Wrong Amount, and Wrong GL Account.
Vendors
Vendors must be set up under Maintenance > new world ERP Suite > Procurement > Vendor Service in order for invoices to be attributed to them during the accounts payable invoice entry process.
Items
Items need to be set up under Maintenance > new world ERP Suite > Procurement > Items. The item is needed to satisfy a required field on the invoice entry screen. These items can be used for analysis, account enforcement, and to trigger the creation of a pending asset.
Bank Accounts
All Bank Accounts that accounts payable invoices could be paid from need to be setup under Maintenance > new world ERP Suite > Banks.
Company FM Settings
The Company FM Settings area contains universal settings that control system behavior within the Accounts Payable Module.
Accounts Payable Tab
Maintenance > Financial Management > Company FM Settings>Accounts Payable Tab
Fields:
Unit of Measure – Select the default Unit of Measure that should display for items. This value is required. This default is used on the Requisition, Purchase Order, and Purchase Order Template pages in Purchasing.
Maximum Payment Amount – Type an amount in Maximum Payment Amount. This value is the maximum amount for which a check should be written. The acceptable range is $0.01 through $999,999,99.99. The system will provide a warning whenever a payment is created over this amount. This field is required.
Apply Discount – This check box dictates whether the Apply Discount check box for items entered on an AP Invoice Entry screen will default to being selected or, cleared.
Process Discounts During – Select the time at which discounts are processed (e.g., invoice processing or, payment processing). This dictates when discounts will be recognized and journalized.
- If Invoice Processing is selected, discount amounts entered in the Discount Amount field on the Invoice Entry screen will be recognized and journalized when the Invoice Entry Batch is posted.
- If Payment Processing is selected, discount amounts in the Discount Amount field on the Invoice Entry screen will be recognized and journalized when the Invoice Payment Batch is posted. This will happen if, and only if, the check date for the Invoice Payment Batch falls within the discount period. Payment Processing cannot be selected if any invoices in the system are in either an Edit or, Open status.
Invoice Due Date Based On – This setting dictates how the Due Date Based on field populates on the Invoice Batch Entry Page.
- If set to Blank, the Due Date Based on field on the Invoice Batch Entry Page will default to Blank.
- If set to Balance Period, the Due Date Based on field on the Invoice Batch Entry Page will default to Balance Period.
- If set to Discount Period, the Due Date Based on field on the Invoice Batch Entry Page will default to Discount Period.
Use P.O. Address as Remittance Address –
- If selected, when an invoice is created, the address entered on the purchase order overrides the primary remittance address defined in the vendor record as long as the vendor’s purchasing contact that the purchase order is attributed to is flagged as a remittance contact as well.
Setting for Complete P.O. Item –
- If selected, this causes the Completes Item check box on the Select Purchase Order method of invoice entry to default to being selected.
- If cleared, the check box will default to cleared on the Select Purchase Order method of invoice entry.
Taxable Item – This check box dictates whether the Apply Taxes check box for items entered on an AP Invoice Entry screen will default to being selected or, cleared.
Payroll Disbursement Item – This setting dictates the Item to be attributed to Payroll Disbursement Invoices being created using the HR Disbursements method of invoice creation.
Pension Loan Item – This setting dictates the Item to be attributed to Pension Loan Invoices being created using the HR Disbursements method of invoice creation.
Worker’s Compensation Claim Item – This setting dictates the Item to be attributed to Worker’s Compensation Claim Invoices being created using the HR Disbursements method of invoice creation.
Group Workers Comp Invoices – This setting defines whether this subset of invoices is grouped by Vendor and Employee, or by Vendor. The default value is Vendor and Employee.
Purchase Order Balances –
- If set to Original Amount, only the original amount entered for each purchase order item will display on the Select Purchase Order method of invoice entry.
- If set to Remaining Amount, both original amount and the remaining amount for each purchase order item will display.
Apply Freight – This check box dictates whether the Apply Freight check box for items entered on an AP Invoice Entry screen will default to being selected or, cleared.
Distribution Method – Select a value to determine how freight charges entered into the Freight Amount field on the invoice entry screen should be charged to the general ledger. The default value is Line Item, other options are Organization, and G/L Account.
- If Line Item is selected, amounts entered into the Freight Amount field will be allocated to the G/L Accounts the items on the invoice are being charged to. This is done proportionately for each item’s (that is flagged to Apply Freight) percent of the total invoice amount.
- If Organization is selected, amounts entered into the Freight Amount field will be allocated to the Account selected in the Distribution Account field within the G/L Organization Set the invoice items are being charged. This is done proportionately for each item’s (that is flagged to Apply Freight) percent of the total invoice amount.
- If G/L Account is selected, amounts entered into the Freight Amount field will be allocated entirely to the G/L Account selected in the Distribution G/L Account field.
Default Retainage Released Invoice Description – The header description entered here will default into invoices entered using the Release Retainage method of invoice creation.
Use Blind Receipt Entry –
- If selected, when receipting against a purchase order, the quantity will default to zero for all items on the purchase order.
- If cleared, the application will show the remaining quantity for all items on the purchase order being receipted against.
Auto-Print “Request for Payment” Form – If selected, the application will automatically print the Request for Payment form to the default printer (established in the form layout setup) each time a receipt of goods is saved.
“Request for Payment” Form Type – This dictates the layout to be used for the Request for Payment form. The options are defined in Validation Set 239, Request for Payment Form Type.
Centralized Accounts Payable Department –
- If a value is selected, all journals from the sub-ledger will be assigned to this central department.
- If not defined, the post may make multiple journals, one for each department specified on an invoice entry batch.
Increment Counter Numbers Based on Fiscal Year –
- If selected, Invoice Entry Batch numbers and system assigned Invoice numbers will use the fiscal year value as the prefix (i.e., Counter Year).
- If cleared, the calendar year is used as the prefix.
Allow Changes to Approved Invoices –
- If selected, the application will allow users to make changes to invoices within an approved Invoice Entry Batch.
- If cleared, all approvals must be removed before changes can be made.
Validation and Approval Sequence – This setting dictates the order that the validation and approval stages of the workflow are to be performed for an Invoice Entry Batch.
- Require Approvals for Validation - If selected, the invoice entry batch must be fully approved before it is eligible to be validated.
- Require Validation for Approvals - If selected, the invoice entry batch must pass validation before it is eligible to be approved.
- Require No Dependencies - if selected, added invoices can be validated and approved in any sequence.
- Require Validation for Approvals - This is the most common selection. When selected, the application is checking the transactions entered before a personal approval is applied.
Verify Date is Prior to PO GL Date – This setting helps ensure that appropriate dates are being used when an invoice is entered against a purchase order.
- Do Not Check - allows users to enter an invoice with a G/L date that precedes the G/L date of the purchase order.
- Give a Warning - allows users to enter an invoice with a G/L date that precedes the G/L date of the purchase order. A warning message alerting users that the action will take place if they choose to proceed. This warning will be displayed.
- Do Not Allow - prevents users from entering an invoice with a G/L date or, invoice date that precedes the G/L date of the purchase order.
Use Invoice Date or Invoice GL Date – Select either the Invoice G/L Date, Invoice Date, or Both date values to prevent users from entering an invoice that precedes the G/L date of the purchase order.
Require Invoice Received Date –
- If selected, the application will require an invoice received date be specified on the Accounts Payable Invoice Entry pages. This is the date that the invoice was physically received; it allows users to compare the date with other significant AP invoice dates (e.g., entry date, posted date, paid date).
- If cleared, entering the Invoice Received Date is optional.
Manual Invoice Number Entry – This field determines whether entering an AP invoice number is required (it cannot be left blank), optional (the system will assign the number if the field is blank), or whether a warning should be issued if the field is left blank.
Update 1099 Information During P-Card Import – This setting dictates whether, or not 1099 transactions will be created for the informational invoices created during the P-Card Import.
Allow Cash Basis Processing – Check to enable cash basis processing in Accounts Payable. A journal entry setting up Accounts Payable will not be recorded during the Invoice Entry process if cash basis is selected. Neither will a journal entry relieving Accounts Payable be recorded during the Invoice Payment process if cash basis is chosen. Under the cash basis method, a journal debiting the expense and crediting cash will be posted to the general ledger upon payment of the invoice.
- If selected, the desired Funds must also be set to cash basis in the Accounts Payable Accounting Method Field. Funds can be updated through Maintenance > new world ERP Suite > Chart of Accounts > Funds. Click on the code to update settings on the respective Fund.
Payment Form Order – This setting dictates the order that AP checks are printed.
- Vendor Name - checks will print in alphabetical order by vendor name.
- Vendor Number - checks will print in numeric order by vendor number.
Include Item Descriptions on Payment Stubs –
- If selected, detail items will print on the check stub as a sub-set of the summary invoice information (invoice date, invoice number, invoice header description, and invoice amount) that they pertain to.
- If cleared, only the invoice date, invoice number, invoice header description, and invoice amount will print on the check stub.
Note: This greatly increases the frequency of stub information overflowing the stub portion of the check.
Validation and Approval Sequence – This setting dictates the order that the validation and approval stages of the workflow are to be performed for an Invoice Payment Batch.
- Require Approvals for Validation - if selected, the invoice payment batch must be fully approved before it is eligible to be validated.
- Require Validation for Approvals - if selected, the invoice payment batch must pass validation before it is eligible to be approved.
- Require No Dependencies - if selected, added invoices can be validated and approved in any sequence.
- Require Validation for Approvals - This is the most common selection. The application checks the transactions entered before a personal approval is applied.
Payment Creates Negative Cash Balance – This setting dictates how invoice payments are handled if cash entries cause a negative balance. The system setting can be used to prevent payments (checks/EFTs) from being generated if cash entries cause a negative balance in the selected fund.
- Do Not Check - allows users to process an invoice payment even when payments cause a negative balance.
- Give a Warning - allows users to process an invoice payment when payments cause a negative balance, but displays a warning message alerting users that the action will take place if they choose to proceed.
- Do Not Allow - prevents users from processing an invoice payment when payments cause a negative balance.
Invoice Terms
Maintenance>new world ERP Suite>Miscellaneous Definitions>Invoice Terms
Invoice Terms allow an organization to maintain terms that define when vendors expect payment (e.g., 30 days or, on the 1st day of the next month). Invoice terms may also include discount periods calculated by discount terms (e.g., 2% 10, Net 30). The discount period and terms specify if the organization makes payment in full within the agreed upon number of days from the Invoice Date, the organization is eligible to receive a discount.
Invoice Terms can be used to automatically populate the Invoice Due Date and automatically calculate the discount amount based on the discount percent established by the Invoice Term identified. The automatic calculation and application of the discount amount only occurs if the Process Discounts During field in Company FM Settings is set to Payment Processing and the invoice is paid within the Discount Period for the Invoice Term it is attributed to.
Creating Invoice Terms
To add invoice terms, click the New button along the bottom of the Invoice Term List page. To work with existing invoice terms, click the term code hyperlink to open the record.
Fields:
Active – New invoice terms default to Active. If an invoice term is no longer applicable, it can be deactivated by clearing the check box and then clicking the Save button.
Term Code – Enter an alphanumeric code that identifies the invoice term (e.g., Net 30). The code must be unique. There are no character restrictions. The maximum character length is 16; the minimum is 1.
Description – Enter a textual description of the invoice term. The maximum character length is 32; the minimum is 1. There are no character restrictions.
Effective Date – Displays the effective date range of the invoice term. This field is disabled when adding a new invoice term. Once the term is created, the field will display all applicable effective date ranges used with the term.
Start Date – Enter or, select the date on which the invoice term goes into effect.
Discount Method – This field dictates how the eligible date range for the discount is determined.
- If Discount Period is selected, the discount is eligible as long as the invoice is paid on a date that falls between the invoice date, and the invoice date plus the number of days referenced in the Discount Period field. The Balance Period field dictates when the invoice is due if the discount is not taken.
- If Current Month is selected, the discount is eligible as long as the invoice is paid by the numeric date (e.g., 15th day of the month) referenced in the Discount Due Day field within the month the respective invoice date falls within.
- If Next Month is selected, the discount is eligible as long as the invoice is paid by the numeric date referenced in the Discount Due Day field within the month, after the month the respective invoice date falls within.
Discount Percentage – Enter a numeric value that defines the percentage discount given if the balance is paid within a specified period of time.
Method –Select a value to determine how discount amounts entered into the Discount Amount field on the invoice entry screen should be charged to the general ledger. The default value is Line Item, other options are Organization and G/L Account.
- If Line Item is selected, amounts entered into the Discount Amount field will be allocated to the G/L Accounts the items on the invoice are being charged to. This is done proportionately for each item’s (that is flagged to Apply Discounts) percent of the total invoice amount.
- If Organization is selected, discount amounts entered into the Discount Amount field will be allocated to the account selected in the G/L Account field within the G/L Organization Set the invoice items are being charged to. This is done proportionately for each item’s (that is flagged to Apply Discounts) percent of the total invoice amount.
- If G/L Account is selected, then amounts entered into the Discount Amount field will be allocated entirely to the G/L Account selected in the G/L Account field.
After filling the required fields on the Invoice Term screen, click the Save button to create the term. Once the term has been created, it is eligible to be selected on Vendor master files. When selected it will automatically populate onto all new invoices created for that Vendor, or, it can be selected on an invoice-to-invoice basis during accounts payable invoice entry. Click Save/New to save the record and create another invoice term on the same page without having to return to the list page.
Sales Tax Codes
Maintenance>new world ERP Suite>Miscellaneous Definitions>Sales Taxes
Sales Tax Codes give an organization the ability to track the sales tax a municipality must pay on goods purchased. If vendors do not add sales tax to their invoices, a municipality may still be responsible for paying the appropriate tax to the collecting entity (local, city, county or state).
Creating Sales Tax Codes
To add sales tax codes click the New button along the bottom of the Sales Tax List page. To work with existing sales tax codes, click the hyperlink in the Tax Code column to open the record.
Fields:
Active – New sales tax codes default to Active. When a sales tax code is no longer applicable, it can be deactivated by clearing the Active check box, and then clicking the Save button.
Tax Type – Select the type of sales tax code being defined. The options are State, County, and Local/City.
Tax Code – Type an alphanumeric code that uniquely identifies the sales tax code. The code can contain up to 16 characters. There are no character restrictions. The combination of Tax Type and Tax Code must be unique.
Description – Type a brief description of the tax code. The description can contain up to 32 characters, with no character restrictions.
Effective Date – Displays the effective date range of the sales tax code. This field is disabled when a new sales tax code is being added. This field will display all applicable effective date ranges used with the tax code, once the tax code is created.
Start Date – Enter or, select the date on which the sales tax code goes into effect.
Tax Percentage – Enter the percentage of tax that will be assessed when this tax code is used. The number must be between 0.01% and 999.99%.
Maximum Amount – Enter the maximum dollar amount that can be assessed using the tax code. The amount must be a number between $0.00 and $999,999,999.99.
Method – Select a value to determine how tax amounts entered into the respective tax field on the invoice entry screen should be charged to the general ledger. The default value is Line Item, other options are Organization and G/L Account.
- If Line Item is selected, the amounts entered into the respective tax field will be allocated to the G/L Accounts that the items on the invoice are being charged. This is done proportionately for each item’s (that is flagged to Apply Taxes) percent of the total invoice amount.
- If Organization is selected, the discount amounts entered into the Discount Amount field will be allocated to the Account selected in the Account field within the G/L Organization Set the invoice items are being charged. This is done proportionately for each item’s (that is flagged to Apply Taxes) percent of the total invoice amount.
- If G/L Account is selected, amounts entered into the Discount Amount field will be allocated entirely to the G/L Account selected in the G/L Account field.
After filling the required fields on the Sales Tax entry screen, click Save to create the Sales Tax Code or, Save/New to save the record and create another sales tax code on the same page without having to return to the list page. Once the code has been created, it must be selected on applicable vendor master files so that the respective tax field (State, County, Local/City) automatically populates onto all new invoices created for that vendor.
User Defined Fields (UDFs)
Maintenance > new world ERP Suite > Security > User Defined Fields
User Defined Fields (UDFs) can be used in Accounts Payable to capture additional information about an invoice that is not facilitated by the standard fields on the invoice entry screens. To set up UDF, navigate to the User-Defined Field list screen.
First, select the appropriate Record Type. The Record Types for Accounts Payable UDFs will be Procurement Forms and Procurement Items. UDF attributed to the Record Type of Procurement Forms pertain to the invoice as a whole. UDF attributed to the Record Type of Procurement Items pertain to individual items on an invoice.
If UDF Section Headers are desired, they can be set-up by selecting the Maintenance Type of Section Headers.
The sequence number field will sequence the Section Headers on the UDF screen in numerical order.
Creating User Defined Fields
Maintenance > new world ERP Suite > Security > User Defined Fields.
To add UDF, change the Maintenance Type to Attributes, then click the New button to add a new field.
Fields:
Name – This is the title of the User Defined Field.
Section Header – If appropriate, select the Section Header that the Attribute should appear within.
Sequence Number – This will determine the order in which the field is presented within the section header.
Data Type - This drop-down has the following options:
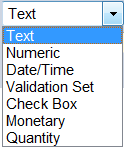
Text – Select this option if the desired field should be text specific. If selected, an additional field will request the maximum number of allowable characters for the field. The options for this entry are 1 to 999.
Numeric – Select this option if a number should be entered in the UDF. If selected, an additional prompt will request the minimum and maximum allowable values. These can be set to negative amounts if desired.
Date/Time – Select this option if a Date/Time should be shown for the User Defined Field.
Validation Set – Select this option if the UDF should present the user with a drop-down from a validation set. If selected, an additional prompt will require specification of the validation set to use. If an additional validation set is required, go to Maintenance>new world ERP Suite>System>Validations Sets>Validation Set List. Click New to create an additional validation set and its entries. A unique (unused) number will be required for any new Validation Set created.
Check Box – Select this option if the UDF should be a simple True/False which can be accomplished by utilizing a check box.
Monetary – This allows for entry of a monetary figure. If selected, the user may specify the desired number of decimal places which can be useful for per unit information.
Quantity – Select this option if quantity information should be recorded in the UDF. If selected, an additional prompt will request the number of decimal places to be recorded.
Required – The Required field will require a user put an entry into the field when accessing the UDF during invoice entry.
Available Applications – Select the applications where the user defined field will be available to use.
- If the record type of Procurement Forms is selected, the options pertaining to accounts payable are Accounts Payable Invoices and Accounts Payable Invoice Templates.
- If the record type of Procurement Items is selected, the options pertaining to accounts payable are Accounts Payable Invoice Items, and Accounts Payable Invoice Item Templates.
After creating the desired UDF, the list of UDF will populate the User Defined Field List screen. They can be edited or, changed by clicking on the Attribute Name to re-open them.
Security Setup
Security for Accounts Payable Processing is controlled through User Based Security, Application Permissions, and Process Manager Setup.
Application Permissions
The Application Permissions for Accounts Payable Processing can often be completed effectively within two general template groupings. However, more compartmentalized templates might be necessary depending on how large an organization is, and how restrictive an organization wants to be in making sure users only have access to the areas of processing pertaining to their specific job duties.
The first general delete template is for invoice entry purposes and typically contains all permissions in the A/P Invoice Processing and Accounts Payable Reports feature groups. The second general template is for invoice payment purposes, and generally contains all permissions in the A/P Payment Processing and Accounts Payable Reports feature groups as well as most of the permissions in the Payment Processing feature group.
Permission Type – Company Applications
Feature Group – A/P Invoice Processing
|
App |
Component |
Description |
All |
Add |
Change |
Delete |
View/Use |
|
|---|---|---|---|---|---|---|---|---|
|
FM |
AP Invoice Import |
The ability to use the invoice import process. |
x |
|
x |
|
|
|
|
FM |
G/L Distributions |
The ability to work with a multiple G/L Account distribution during invoice entry. |
x |
x |
x |
x |
x |
|
|
FM |
Import Accounts Payable Purchasing Card |
The ability to use the P-Card import process. |
x |
|
x |
|
|
|
|
FM |
Invoice Batch Entry |
The ability to create, make changes to, and delete invoice batches. |
x |
x |
x |
x |
x |
|
|
FM |
Invoice Batch Process Manager |
The ability to take invoice batches through the stages of the workflow. |
x |
|
|
|
x |
|
|
FM |
Invoice Batch Process Manager – Execute All Processes |
The ability to use the Execute All option in processing an invoice batch. |
x |
|
x |
|
|
|
|
FM |
Invoice Batch Process Manger - Post |
The ability to perform the Post stage of the workflow for an invoice batch. |
x |
|
x |
|
|
|
|
FM |
Invoice Batch Process Manger – Print Edit & Error Listing |
The ability to generate the invoice batch Edit and Error Listing. |
x |
|
|
|
|
x |
|
FM |
Invoice Batch Process Manger - Validate |
The ability to perform the validation stage of the workflow for an invoice batch. |
x |
|
x |
|
|
|
|
FM |
Invoice Batch Search |
The ability to access the invoice batch list. |
x |
|
|
|
x |
|
|
FM |
Quick Vendor Invoice |
The ability to use the Quick Invoice method of invoice entry. |
x |
x |
|
|
x |
|
|
FM |
Template Invoice Batch Entry |
The ability to create, change, and delete template invoice batches. |
x |
x |
x |
x |
x |
|
|
FM |
Template Invoice Batch Listing |
The ability to print a listing of template invoice batches and the detail of the invoices contained within. |
x |
|
|
|
|
x |
|
FM |
Template Invoice Batch Search |
The ability to see template batches in the template page in an invoice batch. |
x |
|
|
x |
x |
|
|
FM |
Template Invoice Entry |
The ability to create, change, and delete template invoices within template invoice batches. |
x |
x |
x |
x |
x |
|
|
FM |
Template Invoice Search |
The ability to see template invoices within a Template Invoice Batch in the template page in an invoice batch. |
x |
|
|
x |
x |
|
|
FM |
Temporary Vendor Invoice Entry |
The ability to use the Temporary Vendor method of invoice entry. |
x |
x |
x |
x |
x |
|
|
FM |
Vendor Invoice Entry |
The ability to use the full or standard method of invoice entry. |
x |
x |
x |
x |
x |
|
|
FM |
Vendor Invoice Search |
The ability to see the invoice section within the Vendor Inquiry. |
x |
|
|
|
x |
|
|
FM |
Associate Transaction to Asset |
The ability to associate an invoice item to an existing asset record. |
x |
|
x |
x |
x |
|
|
Suite |
Contacts |
The ability to choose from Vendor remittance contacts. |
x |
x |
x |
x |
x |
|
|
Suite |
Import Accounts Payable Purchasing Card – Edit Listing |
The ability to generate the edit listing during the P-Card Import process. |
x |
|
|
|
|
x |
|
Suite |
Import Accounts Payable Purchasing Card – Error Listing |
The ability to generate the error listing during the P-Card Import process. |
x |
|
|
|
|
x |
Permission Type – Non-Company Applications
Feature Group – A/P Invoice Processing
|
App |
Component |
Description |
All |
Add |
Change |
Delete |
View/Use |
|
|---|---|---|---|---|---|---|---|---|
|
Suite |
Vendor Inquiry |
The ability to use the Vendor Inquiry. |
x |
|
|
|
x |
|
Permission Type –Company Documents and Notes
Feature Group – A/P Invoice Processing
|
App |
Component |
Description |
All |
Add |
Change |
Delete |
View/Use |
|
Checkout |
Undo |
Finalize |
Reminder |
|---|---|---|---|---|---|---|---|---|---|---|---|---|
|
FM |
AP Invoice Notes |
Ability to add Notes in invoice entry and inquiry. Any user attaching notes to the AP Invoices will need this permission. |
ü |
ü |
ü |
ü |
ü |
ü |
|
|
|
|
|
FM |
Template Invoice Documents |
Ability to add, view, and work with documents when creating or, maintaining template invoices. |
ü |
ü |
ü |
ü |
ü |
ü |
ü |
ü |
ü |
ü |
|
FM |
Vendor Invoice Documents |
Ability to add, view, and work with documents in invoice entry and inquiry. |
ü |
ü |
ü |
ü |
ü |
ü |
ü |
ü |
ü |
ü |
Permission Type –Company Applications
Feature Group – A/P Payment Processing
|
App |
Component |
Description |
All |
Add |
Change |
Delete |
View/Use |
|
|---|---|---|---|---|---|---|---|---|
|
FM |
Accounts Payable – Create Manual Payment Batch Register |
The ability to create the Manual Payment Batch Register for an invoice batch with invoices flagged for manual checks within the batch. |
x |
x |
|
|
|
|
|
FM |
Accounts Payable – Create Payment Batch Register |
The ability to create the payment batch register for a traditional invoice payment batch. |
x |
x |
|
|
|
|
|
FM |
Accounts Payable Payment Process Manager |
The ability to take invoice payment batches through the stages of the workflow. |
x |
|
|
|
x |
|
|
FM |
Accounts Payable Payment Process Manager – Output Preferences |
The ability to define output preferences when performing the Print Edit & Error Listing stage of the workflow. |
x |
|
|
|
x |
|
|
FM |
Accounts Payable Payment Process Manager – Post Payment Batch and Voided Invoices |
The ability to perform the post stage of the workflow for invoice payment batch. |
x |
|
x |
|
|
|
|
FM |
Accounts Payable Payment Process Manager – Print Edit & Error Listing |
The ability to perform the Print Edit and Error listing stage of the workflow for invoice payment batch. |
x |
|
|
|
|
x |
|
FM |
Accounts Payable Payment Process Manager – Validate Payment Batch |
The ability to perform the validation stage of the workflow for an invoice payment batch. |
x |
|
x |
|
|
|
|
FM |
Accounts Payable Payment Process Manager – View Errors |
The ability to view the errors created during the validation stage of the workflow. |
x |
|
|
|
x |
|
|
FM |
AP Invoice Import Audit Listing |
The ability to generate the audit listing when using the invoice import process. The audit listing shows any errors or, warnings generated from the import file. |
x |
|
|
|
|
x |
|
FM |
AP Invoice Import Edit Listing |
The ability to generate the Edit Listing when using the invoice import process. |
x |
|
|
|
|
x |
|
FM |
AP Invoice Import New Payee Listing |
The ability to run a listing of new payees created during the invoice import process. |
x |
|
|
|
|
x |
|
FM |
Invoice Payment Batch Maintenance |
The ability to create and make changes to invoice payment batches. |
x |
x |
x |
x |
x |
|
|
FM |
Select Invoice for Payment |
The ability to select invoices to be paid within invoice payment batches. |
x |
|
x |
|
x |
|
|
FM |
Void Vendor Invoice |
The ability to select invoices to be voided within invoice payment batches. |
x |
|
x |
|
x |
|
|
FM |
Cash Requirement Listing |
The ability to generate a Cash Requirement Listing when performing the Create Payment Register stage of the workflow for Invoice Payment Batches. |
x |
|
|
|
x |
x |
|
FM |
Email Payment Confirmation |
The ability to email payment confirmations to vendors at the payment batch stage of the workflow for invoice payment batches. |
x |
x |
x |
x |
x |
x |
Permission Type –Company Applications
Feature Group – Accounts Payable Reports
|
App |
Component |
Description |
All |
Add |
Change |
Delete |
View/Use |
|
|---|---|---|---|---|---|---|---|---|
|
FM |
51. Accounts Payable Invoice Report |
The ability to run the Accounts Payable Invoice Report. |
x |
|
|
|
|
x |
|
FM |
52. Accounts Payable Invoice Aging Report |
The ability to run the Accounts Payable Invoice Aging Report. |
x |
|
|
|
|
x |
|
FM |
53. Accounts Payable by G/L Distribution Report |
The ability to run the Accounts Payable by G/L Distribution Report. |
x |
|
|
|
|
x |
|
FM |
Accounts Payable 1099 Activity Report |
The ability to run the Accounts Payable 1099 Activity Report. |
x |
|
|
|
|
x |
|
FM |
Accounts Payable Budget to Actual Report |
The ability to run the Accounts Payable Budget to Actual Report. |
x |
|
|
|
|
x |
|
FM |
Accounts Payable Variance Report |
The ability to run the Accounts Payable Variance Report. |
x |
|
|
|
|
x |
|
FM |
Vendor Invoice Summary |
The ability to run the Vendor Invoice Summary. |
x |
|
|
|
|
x |
Permission Type –Company Applications
Feature Group – All
|
App |
Component |
Description |
All |
Add |
Change |
Delete |
View/Use |
|
|---|---|---|---|---|---|---|---|---|
|
FM |
Item Analysis Report |
The ability to run the Item Analysis Report. |
x |
|
|
|
|
x |
|
FM |
Item Transaction Report |
The ability to run the Item Transaction Report. |
x |
|
|
|
|
x |
Permission Type –Company Applications
Feature Group – Payment Processing
|
App |
Component |
Description |
All |
Add |
Change |
Delete |
View/Use |
|
|---|---|---|---|---|---|---|---|---|
|
Suite |
81. Payment Register |
The ability to run the Payment Register report. |
x |
|
|
|
|
x |
|
Suite |
ACH Transmittal File Listing |
The ability to create the ACH Transmittal File Listing in creating ACH payments in invoice. payment batches. |
x |
|
|
|
|
x |
|
Suite |
Create Payment Register |
The ability to perform the Create Payment Register stage of the workflow for invoice payment batches. |
x |
|
|
|
x |
|
|
Suite |
Payment Standard Messages |
The ability to create, change, delete Standard Messages that can be selected to print on payment stubs. |
x |
|
|
|
x |
|
|
Suite |
Payments – Batch Detail Processing |
The ability to view the details of payments contained within invoice payment batches from the payment batches stage of the workflow. |
x |
|
|
|
x |
|
|
Suite |
Payments – Batch Processing |
The ability to use the payment batches stage of the workflow for invoice payment batches. This is the stage of the workflow where the check, ACH, and positive pay files are created. |
x |
|
|
x |
x |
|
|
Suite |
Payments – Check Detail Inquiry |
The ability to see inquire on payment detail. Payment detail is primarily the invoices that are being paid. |
x |
|
|
|
x |
|
|
Suite |
Payments – Create ACH File |
The ability to create ACH files from the payment batches stage of the workflow for invoice payment batches. |
x |
x |
|
|
|
|
|
Suite |
Payments – Create Positive Pay File |
The ability to create positive pay files from the payment batches stage of the workflow for invoice payment batches. |
x |
x |
|
|
|
|
|
Suite |
Payments – Payment Batch Register |
The ability to recreate the payment register from the payment batches stage of the workflow. |
x |
|
|
|
|
x |
|
Suite |
Payments – Renumber Checks |
The ability to renumber checks from the payment batches stage of the workflow. |
x |
|
x |
|
|
|
|
Suite |
Print AP Checks |
The ability to create the check file for AP checks from the payment batches stage of the workflow. Essentially the ability to generate the checks for the invoice payment batch. |
x |
|
|
|
|
x |
|
Suite |
Print AP Checks Supplement |
The ability to create a separate file for check stub overflow when using a check format that is setup accordingly. |
x |
|
|
|
|
x |
|
Suite |
Print Payments |
The ability to use the print button to create the check file from the payment batches stage of the workflow. |
x |
|
|
|
x |
x |
User Based Security
There are multiple functions within User Based Security that must be set up to allow a user to perform both AP Invoice Entry and AP Invoice Payment.
Bank Accounts – For AP Invoice Entry, users need all bank accounts that they might want to attribute an invoice to during the AP Invoice Entry process. For Invoice Payment, users need access to all Bank Accounts that they might need to create an invoice payment batch for.
Contract Types – Users need access to the appropriate Contract Types in order to attribute AP invoice items to the individual contracts assigned to the respective Contract Type.
Project Categories – Users need use rights to the appropriate Project Categories in order to attribute AP invoice items to the individual Projects assigned to the respective Project Category.
Purchase Order Types – Users need access to the appropriate Purchase Order Types in order to be able to enter AP invoices against the individual Purchase Orders assigned to the respective Purchase Order Type.
Sub Ledgers/Accounts Payable – Determine what users will have supervisor privileges and budget override capabilities. The supervisor privilege will be necessary for any user that needs to be able to approve either invoice entry batches or, invoice payment batches created by other users. In addition, under the G/L Organization tab select the G/L Organization sets each user will be able to enter purchase orders against.
Upper Half of the General Ledger Sub Ledger Screen
Supervisor – Checking this box allows the user to view all journals (insert Accounts Payable ) created by all users on the Journal (insert Accounts Payable ) List in the Journal (insert Accounts Payable) Process Manager. Any user who reviews or approves other user’s journals (Accounts Payable batches) must have this authority. Therefore, the box must be selected. When the box is not selected, the user only sees journals (insert Accounts payable batches) they have created.
GL Budget Override Authority – Selecting this box allows this user to override over-budget warnings generated during the journal process. This permission should be limited to those users that are authorized to permit over budget situations.
Project Budget Override Authority - Selecting this box allows this user to override the over budget warning for projects. This permission should be limited to those users that are authorized to allow over budget situations for projects.
Purchase Order Override Authority – This is inactive for the general journals.
Sub-ledger Detail Authority – When this box is checked the user will be able to view the detail of journals when executing inquiries and reports in the system. If this box is not selected, the user will not be able to drill down to the detail transactions and other support of the general journal entries when executing inquiries and reports.
Process Manager
There are multiple processes that must be set up in the Process Manager to facilitate the receipt of goods process, invoice entry process, invoice payment process, and the ability to report and inquire on those respective transactions.
Accounts Payable – Invoice Entry – This process defines which departments can perform invoice entry, and the approval structure that invoice batches attributed to each department are subject to.
Accounts Payable – Invoice Payment – This process defines which departments can perform the invoice payment process, and the approval structure that invoice payment batches attributed to each department are subject to.
Accounts Payable – Receipt of Goods – This process defines which departments can perform the receipt of goods entry process. There is no approval structure for receipt of goods.
Purchasing – Procurement Inquiry – This process defines where inquiries, and reports can be generated. Determination of which departments Purchasing, Accounts Payable, and Receipt of Goods transactions can be inquired and reported upon is selected here. This process also dictates which departments’ purchase orders a user can use during invoice processing.
Accounts Payable Processing
Accounts Payable Processing falls into three main areas: Receipt of Goods, Invoice Entry, and Invoice Payment.
Receipt of Goods
Receipt of Goods is intended to allow an organization to track goods that have been received and/or, services that have been rendered. This can be used in the invoice entry process to make sure invoices are only being entered and paid for when goods have actually been received. This ensures that the organization doesn’t pay for goods and/or, services that have not been received even though the vendor may have billed for them.
Receipt of Goods Shippers (Receipt of Goods transaction) can be entered in two ways; against a Purchase Order to show what has been received against the quantity ordered or, entered from scratch (no Purchase Order to receive against).
Receipt of Goods List
Financial Management > Receipt of Goods
The Receipt of Goods list will display all Shippers entered for the current day by default. The list can be refreshed by clicking the Refresh button along the bottom of the list to make sure that the most current list of Shippers entered for the current day is displayed. The list can be re-sequenced by the items each Shipper has on it by selecting the Show by Item check box along the top of the list.
To display a previous day’s Shippers or, narrow down list contents, click the  icon in the upper-left corner of the list to limit results using search criteria.
Fields:
The entered criteria determines the Shippers displayed in the list.
Department – This field can be used to isolate Shippers attributed to a particular department.
Location – This field can be used to isolate Shippers attributed to a particular Location.
From Receipt Date/To Receipt Date – These fields can be used to isolate Shippers with a Receipt Date in between the respective to and from date range.
Purchase Order – Enter a purchase order number to isolate Shippers that were entered against a specific purchase order.
Item – Select an item to isolate Shippers where the respective item has been received.
Vendor – Select a vendor to isolate Shippers attributed to that respective vendor.
Vendor Shipper – Enter a Shipper number to isolate a specific Shipper.
Receipting Against a Purchase Order
To pull up a fresh Shipper (Receipt) entry screen, click the New button on the lower-left hand corner of the Receipt of Goods list. The Add Receipt entry screen will appear.
The users’ home Department and Location will default in for the Shipper. If either needs to be changed for this Shipper, it can be done by clicking on the pencil icon on the far right-hand side of the screen which will open the Change Defaults pop-up.
The Shipper entry screen is divided into two main sections. The General Section pertains to the receipt as a whole and the Receive Items Section which falls beneath the Vendor and Purchase Order Fields. When receipting against a purchase order, the fields in the Receive Items section should not be used as the items will be selected directly from the Purchase Order.
General Section
Fields:
Date – The date will default to today’s date. It can be changed if necessary.
Received By – This field is intended to indicate who actually took possesion of the respective goods or, services. If the organization has licensed the Human Resources application, the options in the Received By field will pull from the Employee Master files. If the organization has not licensed the Human Resources application, the options in the field will pull from Validation Set #38 – Employee.
Vendor – When the vendor is selected, the application will display all open purchase orders for that vendor beneath the General Section. If a purchase order number is entered into the Purchase Order field before a vendor is selected, the Vendor field will populate automatically with the vendor the purchase order is attributed to.
Vendor Shipper Number – A shipper number can be entered into this field or, the field can be left blank. If left blank, the application will assign a shipper number using the standard numbering convention of the four digit year followed by the next sequentially available number. If a packing slip number was provided by the vendor, this is often keyed in as the shipper number.
Comment –Text comments can be entered up to 64 characters.
Purchase Order – If the purchase order number is known, it can be keyed directly into this field. The purchase order can be inquired on by clicking the scope icon to the right of the field. After the purchase order is selected, the purchase order and its items will display beneath the General Section.
Once the General Section is filled out, the user needs to select the items to be receipted onto the Shipper from the respective purchase order(s).
In the table where the purchase order and its items are displayed, there are check boxes along the left side to select which items are to be receipted onto the Shipper. Select the check box to the left of the purchase order number to select all of the items on the purchase order. If only certain items need to be included, select the check box to the left of each individual item. For the selected items the Quantity field, Unit of Measure field, and Completes PO Item check box become available. If a user wants to inquire on the purchase order, the purchase order number is a hyperlink that will open a pop-up inquiry.
Fields:
Quantity – Enter the quantity to be receipted in. The quantity that defaults in is dependant on the Use Blind Receipt Entry check box on the Accounts Payable tab in Company FM Settings. If Use Blind Receipt Entry is selected, the Quantity field defaults to 0. If Use Blind Receipt Entry is cleared, the remaining quantity (quantity not yet receipted in) will default into the field.
Unit of Measure – This field will default to the Unit of Measure that was selected when the purchase order was created.
Completes PO Item – When selected, this item will complete from the purchase order when the shipper is invoiced against it, releiving any remaining encumbrance. If left cleared, the remaining quantity will be left open on the purchase order. This box should be selected if the entire quantity for the item is being received or, if the remaining quantity is no longer needed.
After the appropriate items have been selected, click the Apply button to add them to the Shipper. After clicking the Apply button, the selected items from the purchase order will appear in the item list for the Shipper.
The item can be reopened to reference a quantity returned or, back ordered by clicking on the value in the Item column. The item can be removed from the Shipper by clicking on the Red X in the last column of the item list.
Additional items can be added to the Shipper from scratch (not pertaining to a purchase order) by using the fresh item entry section that appears on the left of the Receive Items Section of the Shipper entry screen. These fields will be described in detail in the next section.
Buttons:
If all of the necessary items have been added to the Shipper, and no additional Shippers need to be added at this time, click the Save button. If additional items need to be added from scratch, the Save/New Item button can be used to save what has been entered thus far and open up a fresh item entry section on the left of the Receive Items Section of the Shipper entry screen. If all of the necessary items have been added, and additional Shippers need to be added, the Save/New Receipt button can be used to save what has been entered, and open a fresh Shipper entry screen as a whole. The Reset button can be used to reset the Shipper back to its status as of the last save.
Receipting without a Purchase Order
To pull up a fresh Shipper entry screen, click the New button along the lower left-hand corner of the Receipt of Goods list.
The fields in the General Section are the same as when receipting against a purchase order with the exception of the Purchase Order field. The Purchase Order field would not be used when receipting from scratch. After the vendor has been selected, any open purchase orders for that vendor will display by default. To hide these purchase orders, and open the Receive Items Section of the Shipper entry screen, click the double arrow icon just beneath the Vendor field.
Fields:
Item – Select the Item to be used. There are three icons to the right of the Item field. The first icon is Search  , which opens a pop-up where additional criteria can be used to search for the appropriate item. The second icon is Analysis
  . A value must be selected from the Item drop-down before selecting this icon. Once clicked, the Procurement Analysis pop-up appears, showing historical purchase information for the item. The third icon is Detail
  which can be used to change how items display in the drop-down and the primary field being used to search by (Description, Quick Code, and Item Number.)
Description – Enter a textdescription for the item. Up to 64 characters may be entered.
Quantity – Enter the quantity to be receipted in.
Returned – Enter the quantity that was returned to the vendor if applicable.
Unit of Measure – Select the appropriate unit of measure for the items being received.
Comments – Enter any comments that are specific to this item on the Shipper.
Backordered Quantity – Enter any quantity that needs to be referenced on back order for the shipper. This is for informational purposes only.
Backordered Delivery Date – Enter the expected delivery date for the back ordered quantity if available.
Buttons:
If all of the necessary items have been added to the Shipper, and no additional Shippers need to be added at this time, click the Save button. If additional items need to be added from scratch, the Save/New Item button can be used to save what has been entered thus far, and open up a fresh item entry section on the left of the Receive Items Section of the Shipper entry screen. If all of the necessary items have been added, and additional Shippers need to be added, the Save/New Receipt button can be used to save what has been entered, and open a fresh Shipper entry screen as a whole. The Reset button can be used to reset the Shipper back to its status as of the last save.
Adjusting a Receipt of Goods Shipper
Shippers can be adjusted after the initial entry if corrections need to be made. This is usually done to correct entry errors, or, to correct the Shipper when it is determined that items need to be returned after the initial entry. To make adjustments to a Shipper after the initial entry, click on the vendor hyperlink to the right of the shipper number that has to be adjusted from Receipt of Goods list to re-open the shipper.
To open the item that has to be adjusted, click on the value in the item column of the item list on the Shipper.
The application recognizes that the item is being adjusted, and will bring in two additional fields; Adjustment Date and Reason.
Fields:
Adjustment Date – The date will automatically populate with today’s date but, it can be changed if necessary.
Reason – The reasons available for selection pull from Validation Set #244 Receipt of Goods Adjustment Reason.
After the necessary adjustments have been made, click the appropriate Save button along the bottom of the entry screen.
Inquiries on Receipt of Goods Shippers can be made through vendor inquiry. Receipt of Goods Shippers can be reported on through the Receipt of Goods Report.
Accounts Payable Invoice Entry
Financial Management>Accounts Payable>Invoice Entry Batches
The first half of the accounts payable process is invoice entry. This process starts from the Invoice Batch List.
The Invoice Batch List shows all invoice batches that are currently open, and allows users to create new batches in order to enter more invoices. Each row in the list represents a unique invoice batch The batches a user has visibility to are determined by the departments the user is authorized toprocess for Accounts Payable – Invoice Entry in the Process Manager, and also by the Supervisor check box for the Accounts Payable Sub-ledger in User Based Security. If the user has Supervisor rights, they will be able to see all open batches for the departments to which he/she is authorized. If not, the user will only see the batches that he/she has created.
Along the top of the list, users can see the stages of the workflow that the Invoice Batch is subject to in order to become posted. Whether validation is required for approvals, or not is determined by the configuration defined on the Accounts Payable tab in Company FM Settings.
Within the list the following columns are displayed:
myTasks – A check mark in this column indicates if the batch is awaiting approval at the users assigned level in the approval structure. If there is a check mark in this column, the batch is also referenced in the myTasks section of the users’ homepage.
Validated – This column indicates if the batch has passed, failed, or not yet been submitted for validation. If the batch has passed, there will be a Green Check Mark in the column. If the batch has failed, there will be a Red X in the column. If the batch has not yet been submitted for validation, the column will be blank.
Approvals – This column indicates where each batch is at in the approval structure. The approval structure that each departments’ batches are subject to is defined in the Process Manager for the process of Accounts Payable-Invoice Entry. This value is hyperlinked to allow the user to quickly navigate into the Approval Page within the batch where invoices can be reviewed, and then, subsequently approved, returned, or denied. Users can also remove their approvals from this page. If a user hovers over this value, additional approval information is displayed.
Department – This column indicates the department that each batch is attributed to.
Batch Number – This column indicates each batch number. This value is hyperlinked to allow users to open a batch from the list if additional review, or entry work is required within the batch. If a user hovers over this value, additional information pertaining to the batch as a whole is displayed.
Batch Date – Is usually the creation date, however it can be any date useful to the organization.
Invoice Count – This column shows the number of invoices that have currently exist within the batch.
Gross Invoice – This column shows the total dollar value of the invoices that have currently exist within the batch.
Buttons:
New – Opens a fresh Invoice Batch entry screen.
Delete – Deletes whichever batch is currently selected (highlighted in yellow) in the list.
Refresh – Refreshes the list to make sure that the most up to date list of open invoice batches is being displayed.
Import – Click to begin the import process to create a batch of invoices from a file either manually created or, exported from another system.
Import Purchasing Card – Click to begin the import process to create a batch of invoices from a file created by the respective purchasing card provider.
Create Manual Payment Register – Click to create the manual payment register for an invoice batch that contains at least one invoice selected to be paid by manual check. This button is deactivated by default. It only becomes available for selection when a batch containing at least one invoice selected to be paid by manual check is contained in the list. If a batch contains manual check invoices, the batch must first have passed validation, and be fully approved before the button will become active.
Creating an Invoice Batch
Click the New button along the lower-left corner of the Invoice Batch List to open a fresh Invoice Batch entry screen.
Fields:
Invoice Batch General PageDepartment – The users’ home department will default into this field. If the user is authorized to create batches on behalf of multiple departments, the appropriate department can be selected from the options in the drop-down. The departments a user may select from is dictated by the setup in the Process Manager Accounts Payable – Invoice Entry process. Once the batch has been saved/created, the department cannot be changed.
Date – The date the batch is attributed to would appear here. The field defaults to today’s date but, can be changed if necessary. It is intended to indicate the date the batch was created. Once the batch has been saved, and created, the date cannot be changed.
Number – This dictates the batch number assigned when the batch is saved. Users can enter a batch number of their own choosing using up to 13 alphanumeric characters. If the field is left blank, the system will assign a batch number using the standard numbering convention of four digit year prefix, followed by leading zeros and the next sequentially available number. Once the batch has been saved/created, the batch number cannot be changed.
All fields that appear after the batch number can be changed after the batch has been saved and created.
Total – This field is an optional check sum, or control total. If the user enters an amount into this field, it is taken into account when the batch is validated. If the total of the invoices within the batch does not equal the amount entered into this field, the batch will fail validation. If the field is left blank, it is not used during the validation stage of the workflow.
Batch Description – This field is an optional description for the batch as a whole. It appears if a user hovers over the batch number while viewing the Invoice Batch List. It also shows on the edit and post listing created when the batch is processed through the workflow. This field is often used if the batch is for a specific purpose or, type of invoice such as Overpayment Refunds or, Juror Payments.
Vendor – If all or, most of the invoices to be entered into a batch are for the same vendor, the vendor can be defaulted in automatically. This will automatically populate onto each invoice on all consecutive entry screens.
Remittance – If a vendor default was selected, the primary remittance contact for the vendor will default into this field. If the vendor has multiple remittance contacts, the appropriate remittance contact can be selected to default into each invoice entry screen. If a default vendor was not selected, this field is not applicable.
Date – The invoice date in this field will default into this field as the invoice date for all invoices entered into this batch. The date defaults to today’s date, but, can be changed, or even cleared if it is desired. The field can be updated on each invoice entry screen to the appropriate invoice date for each individual invoice.
Due Date – The date in this field will default in as the invoice due date for all invoices entered into this batch. The date defaults to today’s date, but, can be changed or, even cleared if desired. The field can be updated on each invoice entry screen to the appropriate invoice date for each individual invoice.
G/L Date – The date in this field will default in as the invoice G/L date for all invoices entered into the batch. The date defaults to today’s date, but, can be changed or, even cleared if it is desired. The field can be updated on each invoice entry screen to the appropriate invoice date for each individual invoice.
Received Date – The date in this field will default in as the invoice received date for all invoices entered into the batch. The date defaults to today’s date but can be changed or, even cleared if it is desired. The field can be updated on each invoice entry screen to the appropriate invoice date for each individual invoice.
Paying Bank – If all of the invoices to be entered into the batch are to be paid from the same bank account, a default paying bank account can be selected so that it automatically populates onto each invoice entered in the batch.
Item – If all of the invoices to be entered into the batch are to be attributed to the same item, it can be defaulted in so that it automatically populates onto each invoice entered into the batch.
Description – If all of the invoices to be entered into the batch need the same header description, it can be defaulted in so that it automatically populates onto each invoice entered into the batch.
Amount – If all of the invoices to be entered into the batch are for the same amount, it can be defaulted in so that it automatically populates onto each invoice entered in the batch.
G/L Account – If all of the invoices to be entered into the batch are to be charged to the same G/L Account, it can be defaulted in so that it automatically populates onto each invoice entered in the batch.
Retain Entries – If selected, this check box dictates if a change is made to any of the fields that are defaulted in during the individual invoice entry screens, then the value the field was changed to will become the new default for the next invoice entry screen. If cleared, defaults will continue to populate as they were defined on the general page for the batch even if they are overridden on individual invoices.
Use G/L Defaults – If selected, G/L accounts can automatically populate onto the invoice entry screen based upon the default organization set the selected department is attributed to, and the primary expense account the selected item is attributed,
Due Date Based On – The available options are Balance Period and Discount Period. This field is only applicable if invoice terms are being used. When Balance Period is selected, the due date for an invoice can automatically be populated based on the balance period for the selected invoice term and the invoice date that was entered. Discount is populated based on the discount period for the selected invoice term and the invoice date that was entered.
Once the appropriate values have been defined for the batch, the buttons along the bottom of the General page can be used as follows.
Buttons:
Save – Click to save and create the batch. Once clicked, the application will automatically bring the user into the Invoice Entry screen.
Save/New – Click to save and create the batch. Afresh batch entry screen will appear. This button should be used if multiple batches need to be created before invoice entry into the batches begins.
Delete – Click to delete the batch. This button only becomes available after the batch has been saved.
Reset – Click to reset the batch or, General page settings to be exactly as they were as of the last save.
Once the batch has been saved and created, invoices can be entered into the batch.
The icons along the top of the screen become available after the batch has been created. If the cursor is positioned over an icon the description for the respective icon will display to the right of the icons. The page that the user is currently on, within the batch, is indicated by the highlighted icon. The icons are as follows:
 General – The general icon can be clicked to navigate back to the batch settings to make any necessary changes.
 List – This icon will take the user into the list of invoices that have currently been saved within the batch.
The list also includes a summary fiscal section along the top where the user can see the respective totals based on the invoices that have been entered into the batch thus far.
From the list within the batch, a user can reopen previously entered invoices by clicking on the respective invoice number.
List Tab Buttons:
Delete – Selected invoices can be deleted by clicking into the respective row so the invoice is highlighted in yellow, and then, by clicking this button.
Refresh – Click this button to ensure the most current list of invoices within the batch is being viewed.
Export – Click this button to export information in the list. A pop up will open where the desired columns for export can be selected, along with the desired export format.
Reassign - Select invoices using the check boxes in the first column of the list, and reassign them into other batches by then clicking the Reassign button. This is often used by customers to move invoices that are at issue or, over budget, into a separate holding batch so that the invoices without issues within that batch can be processed.
 Invoice Entry – This icon will take the user into the invoice entry screen where invoices can be added to the batch using the various methods of invoice entry.
 Templates – This icon will take the user into a list of template batches and template invoices where the user can make a selection, using check boxes, to identify which template invoices should be brought into the batch. Click the accept button to add the selected templates into the new batch.
 HR Disbursements – This icon will take the user into a screen where HR Disbursement invoices, created by the payroll process, can be selected to be brought into the batch. These HR Disbursements include employer payroll taxes, employee withholding taxes, garnishments, both the employer and employee health care costs, etc., Search criteria are available to allow the user to narrow down to select HR Disbursement Invoices based on From and To Date, Vendor, Disbursement Type, and by Pay Batch. Disbursement invoices can then be brought into the invoice batch by using the check boxes to select. By clicking the Accept button,they will be brought into the batch. This icon is only available if the Human Resources application has been licensed.
 Release Contract Retainage – This icon will take the user into a list of vendors and their respective contracts. From here, the user can select the contract and retainage amount to automatically create an invoice. Search criteria are available to narrow down based on the Vendor, and/or Contract. The user can then click the plus icon, to the left of the Vendor to see all of the contracts with retainage attributed to that vendor. Then use the check boxes to select which contract aretainage releasing invoice will be created. The user also has the ability to continue to drill down using the plus icons to see which invoices specifically had retainage withheld, and edit the amount to be remitted for each. After selecting the appropriate contracts to remit, and editing the amounts to be remitted, if desired, the user would then click the Accept button to add the retainage releasing invoice to the batch. This icon is only available if Contract Accounting has been licensed.
 Validate – This icon allows the user to perform the validation stage of the workflow for the batch currently opened.
 Approvals – This icon allows the user to navigate into the approval page for the batch currently openedThe batch can then be Approved, Returned, or Denied provided it is up to the approval stage in the workflow.
 Print Edit and Error Listing – This icon allows the user to perform the Print Edit and Error Listing stage of the workflow for the batch currently open.
Entering Invoices
There are multiple methods of invoice entry available in an invoice batch. Once the user has navigated to the Invoice Entry page within the batch, those methods of invoice entry are represented by icons in the blue bar running down the left-hand side of the invoice entry screen, directly beneath the General icon for the batch.
The methods of invoice entry available are represented as tabs down the left side of the Invoice Entry tab page. They are as follows: Invoice, Quick Invoice, Temporary Vendor Invoice, Sales Tax Invoice, Select Purchase Order, and Select Shipper. The last three icons are not methods of invoice entry, but, optional attachments that can be associated to an invoice once it has been entered and saved.
Invoice
The Invoice method of invoice entry, often referred to as the full invoice, offers all of the fields potentially available during invoice entry. This method allows for Freight, Discounts, and Taxes to be broken out in the invoice header. This method also allows for multiple items to be added to the invoice. No matter what method of entry was used for initial entry, when an invoice is reopened from the list within the batch, it is opened into the Invoice or, full invoice entry screen. This allows freight, discounts, and taxes to be added in the case of invoices entered using the Select Purchase Order or, Select Shipper methods of entry where the respective freight, discounts, and taxes might not have been established on the purchase order.
The Invoice or, full invoice entry screen is divided up into two main sections, the Header and the Invoice Items section.
Header Section Fields:
Department – The department will default in based on the department that the batch is attributed to, but, it can be changed on an invoice-to-invoice basis if necessary.
Vendor – Select the vendor the invoice is from. It is possible to search the vendor list by typing part of the vendor name or. vendor number. The system will automatically narrow down the available vendors based on the search criteria entered.
Vendor Invoice – Enter the vendor provided invoice number. If the field is left blank, the system will assign an invoice number when the invoice is saved. The standard numbering convention of four digit year prefix, followed by leading zeros, and the next sequentially available number will be used. The field allows up to 16 alphanumeric characters. The application will not allow the same value to be used with a particular vendor more than once, or an error will be returned. Depending on the settings established on the Accounts Payable tab in Company FM Settings, this field may require the manual entry of an invoice number or, trigger a warning if one is not manually entered. This number will print on the payment stub when a payment is created.
Description – Enter the header description pertaining to the invoice as a whole. The field allows up to 64 alphanumeric characters. This description will print on the payment stub when a payment is created. If User Defined Fields have been created for the record type of Procurement Forms, they can be populated by clicking the icon to the right of this field. The icon will only display if these UDFs have been created.
Invoice Amount – Enter the invoice amount. Do not include freight, discount, or tax amounts if those fields are to be used in the header. The application will validate the amount entered in this field against the total of the items added to the invoice during the validation stage of the workflow.
Freight Amount – Enter the applicable freight amount. The amount will be distributed to the general ledger based on the method selected in the Accounts Payable tab of Company FM Settings.
Discount Amount – Enter the applicable discount amount. Enter a positive amount. The invoice will be reduced by this amount when a payment is created. The discount amount field requires that an invoice term also be selected to dictate how to distribute the discount to the general ledger. The amount will be distributed to the general ledger based on the method selected on the Invoice Term master file.
State, County, and City/Local Tax Amount – Enter the applicable tax amount. The tax fields will only display if the respective tax codes have been setup on the selected vendor’s master file setup. The amount will be distributed to the general ledger based on the method selected on the Sales Tax Codes master file.
Invoice Terms – Select the applicable invoice term. If the invoice term was defaulted into the vendor master file it will automatically populate once the vendor is selected.
Remittance – The vendor’s primary remittance contact will populate once the vendor is selected. If the vendor has multiple remittance contacts, a different contact can be selected either by using the drop-down or, the VCR controls on either side of the field. As a user hovers over the field, the address attributed to the selected contact will display.
Invoice Date – The invoice date defaulted in on the general page for the batch will populate automatically, but, it can be overridden on an invoice-by-invoice basis, as needed. This date will print on the payment stub when a payment is created.
Due Date – The due date defaulted in on the general page for the batch will populate automatically. However, it can be overridden on an invoice-to-invoice basis, as needed. If an invoice term was selected, and the batch was set up to automatically populate due dates, based upon either the balance, or discount period, then the due date will automatically populate based on the invoice term set up and the invoice date.
G/L Date – The G/L date defaulted in on the general page for the batch will populate automatically. However, it can be overridden as needed on an invoice-to-invoice basis.
Received Date – The received date defaulted in on the general page for the batch will populate automatically, It can be overridden on an invoice-to-invoice basis, as needed. This field may be required based on the selection made in the Accounts Payable tab of Company FM Settings.
Paying Bank – The paying bank defaulted in on the general page for the batch will populate automatically. This can be overridden on an invoice-to-invoice basis, as needed. The bank accounts available for selection are dependent on User Based Security.
Hold Payment Reason – A hold payment reason can be selected if desired. The application will not allow a payment to be created for any invoice that has a hold payment reason attributed to it. The hold payment reason must first be removed. Then the invoice will be eligible to be paid. Hold payment reasons can be removed within an Invoice Payment Batch. This field is populated by Validation Set # 29.
Manual Check – If selected, the application will require that the manual payment register be created for the batch. Additionally, it will require a payment be created from the Payment Batch stage of the workflow before the batch can be posted. The manual check process facilitates the creation of a payment without going through the process of creating an invoice payment batch.
Use Confirming EFT – If selected, the application assumes that a payment was made by some other means outside of New World ERP. When the batch is taken through the workflow, and posted, the invoice will automatically be updated to a status of paid. The general ledger distributions for the invoice will debit the G/L Accounts selected and credit cash directly without touching an accounts payable liability account. This is typically used to accommodate wire payments made outside of New World ERP. The advantage being, the organization still has a record of the invoice in the system that is reportable and inquireable. The system will still create a system generated journal to distribute to the general ledger.
EFT G/L Date –When Use Confirming EFT is selected, the EFT G/L Date will automatically populate this field with the date entered in the G/L Date field.
Check Sort Code – A check sort code can be selected if desired. When checks are printed, all the checks for invoices attributed to a particular sort code group will print together. This drop-down is populated by Validation Set # 258.
Check Code – Check codes can be used to facilitate separate checks for multiple invoices to the same vendor, paid within the same invoice payment batch. If the field is left blank, all the invoices will be paid by one check at the time the invoice payment batch is processed. The application will create separate checks for all invoices with a unique value in this field.
The following fields are available in the Invoice Items section of the Invoice entry screen.
Invoice Items Section Fields:
Item – Select the appropriate item to attribute to the invoice. There are four icons available to the right of the item field which can be used in as follows:
- Search – Click the icon to open a pop-up where additional criteria can be used to isolate the appropriate or, desired items.
- Analysis – Click the icon to open a pop-up where previous purchase information will be displayed for the item.
- Settings – Click the icon to open a pop-up where the user can define how they would like items to display in the drop-down, and how they would like to primarily search for items.
- Associate to Asset – Click the
 icon to open a pop-up where the user can select an existing asset record to associate with the invoice item. If the association is selected as Material, the value of the item will be added as a positive adjustment to the selected asset value.
Fields:
Description – A text description can be entered for the invoice item. The application allows 64 alphanumeric characters in the field. If user defined fields have been created for the Procurement Items record type, they can be populated by clicking the icon to the right of this field. The icon will only display if these UDFs have been created.
Quantity – Enter the appropriate quantity to be paid.
Unit of Measure – Select the appropriate unit of measure for the item. The drop-down is populated by Validation Set # 30.
Price per Unit – Enter the applicable price per unit.
Vendor Part Number – Enter a vendor part number if desired. This is for historical inquiry purposes only.
G/L Account – Select the G/L account the item should be charged to. The user can type in the G/L account number, or click the icon to search for a specific G/L account. If an item needs to be charged to multiple G/L accounts, clicking on the Multiple G/L icon will allow the user to assign an item to multiple G/L accounts. After saving the purchase order, a telescope icon next to the G/L account field will allow a budget analysis on the G/L account that was selected to be performed.
Users will only have access to the G/L accounts they were assigned in User Based Security for the Accounts Payable Sub-ledger. The G/L Organization sets which were assigned for the Accounts Payable sub-ledger will govern the G/L accounts available for use.
Project – If the G/L Account selected allows project usage, than a project can be selected to charge in conjunction with the G/L Account. The search icon to the right of the field can be used to search for a project using additional criteria.
Contract – If the item should be charged to a particular contract, select the appropriate contact from the options in the drop-down.
1099 Type – The 1099 type field will only display if the selected vendor was set up as a 1099 vendor. The field will automatically populate with the 1099 type setup on the vendor master file. If this transaction should not be a 1099 transaction for the vendor, this field should be cleared.
1099 Box – The 1099 box field will only display if the selected vendor was set up as a 1099 vendor. The field will automatically populate with the 1099 box set up on the vendor master file. If this transaction should not be a 1099 transaction for the vendor, this field should be cleared.
Completes P.O. Item – This field is only applicable when re-opening items on an invoice originally entered against a purchase order. If the item was selected to be complete from the purchase order during the initial entry, it will be selected accordingly. If the item should not be complete from the purchase order from which it was selected, uncheck the box.
Apply Freight – If selected, amounts entered in Freight on the invoice entry screen’s header section will potentially be allocated to the distribution established for the item. It will be done proportionately for this item’s percentage of the overall invoice amount. This is dictated by the distribution method selected for freight in the Accounts Payable tab of Company FM Settings.
Create New Asset – If the item selected in the item drop-down menu was set up as an asset item, the Create New Asset check box will be selected automatically, to create a pending asset when the invoice is posted.
Apply Discounts – If selected, amounts entered in the discount field of the invoice entry screen’s header section will potentially be allocated to the distribution established for the item. It will be done proportionately for this item’s percentage of the overall invoice amount. This is dictated by the distribution method setup on the selected invoice term.
Apply Taxes - If selected, amounts entered in the tax fields in the invoice entry screen’s header section will potentially be allocated to the distribution established for that item. This will be done proportionately based on this item’s percentage of the overall invoice amount. This is dictated by the distribution method set up on the sales tax codes attributed to the selected vendor.
Buttons:
Once the necessary fields in the Invoice Items section of the invoice entry screen have been populated, the buttons along the bottom of the invoice entry screen can be used as follows:
Save – Click to save everything that has been added to the invoice thus far. If an over budget situation was created by the item entered on the invoice, than a pop-up would display showing the extent of the over budget situation. If the user has budget override authority, they can click the override button to allow the over budget situation to pass the validation stage of the workflow.
Save/New Item – Click to save everything that has been added to the invoice thus far. This will also open a fresh invoice item section within the same invoice to add additional items.
Save/New Invoice – Click to save everything that has been added to the invoice thus far and open a fresh invoice entry screen.
Delete – Click to delete the invoice as a whole. If it is later determined that the invoice was appropriate, it will have to be re-entered from scratch.
Reset – Click to reset all fields on the invoice entry screen to exactly as they were as of the last save.
HR Disbursements – Clicking on this button will open a screen where HR Disbursement items attributed to that same vendor can be searched, selected, and accepted onto the invoice.
P.O. Items – Click to open a screen where purchase order items attributed to the same vendor can be selected and accepted onto the invoice.
Shipper – Click to open a screen where shipper items attributed to the same vendor can be selected and accepted onto the invoice.
As items are saved onto the invoice using various methods of entry, they are added to the item table on the invoice.
From the item table, the items can be reopened by clicking on the description or, deleted by clicking on the Red X in the column on the far right.
Quick Invoice
The Quick Invoice method of invoice entry is intended for invoices where only one item is necessary, and where there is not a need to break freight, discounts, and taxes out into their own fields. It is a far more efficient method of entry for basic invoices, as there aren’t as many fields to go through. The entry screen is comprised of one comprehensive entry section.
Fields:
The fields, icons, and buttons that are available on the quick invoice entry screen have the same functionality as their counterparts on the full invoice entry screen with the following exception:
Purchase Order – The Quick Invoice method of invoice entry can be used to invoice against a purchase order. However, the purchase order can contain only one item as this is the limitation of the Quick Invoice method of invoice entry. Enter the purchase order number into this field and the fields on the entry screen will be populated based on what was entered on the purchase order. The icon to the right of the purchase order field can be clicked to open an inquiry pop-up for the selected purchase order.
Temporary Vendor Invoice
The Temporary Vendor method of invoice entry can be used to enter invoices where there is no preexisting vendor master file. The Temporary Vendor method of invoice entry is similar to the Quick Iinvoice method of entry in that only one item can be added to the invoice. This method of invoice entry should only be used when the invoice absolutely is not a 1099 transaction. The Temporary Vendor method of entry is typically used in situations where the vendor is likely to only be used once. In that case, it is not as important to be able to view or, report on comprehensive activity for the vendor, which is what the preexisting vendor master file facilitates.
The vendor information to be used on the payment that is created for this invoice is entered in the Vendor section of the entry screen. The fields are as follows:
Fields:
Last Name – Enter the vendor’s last name or, the business name.
First Name – Enter the vendor’s first name, if applicable. This field is optional.
Middle Name – Enter the vendor’s middle name, if applicable. This field is optional.
Suffix – This drop down is populated by Validation Set # 24.
Address – Enter the vendor’s address.
Zip Code – Enter the vendor’s zip code.
City – Enter the vendor’s city.
State – Enter the vendor’s state.
The fields in the Invoice section of the Temporary Vendor invoice entry, and the buttons along the bottom have the same functionality as their counterparts on the full invoice entry screen.
Sales Tax Invoice
The Sales Tax Invoice page is used to calculate use tax liability to pay a government agency. This looks at the tax entered on invoices for a set date range. The System will calculate any remaining tax not paid based on the amounts entered into the tax fields, along with the actual percentages specified as owed, when using the Sales Tax Wizard. Whenever the amount entered in the tax field is less than the actual percent owed for items flagged as taxable on the invoice, the Sales Tax Invoice will calculate the difference, and add all of these situations together. A comprehensive invoice will be created to remit the overall use tax liability to the appropriate state agency or, vendor.
The fields on the initial screen for the Sales Tax Invoice serve the same purpose as their counterparts on the full invoice entry screen. After these fields have been populated, click the Next button on the bottom of the entry screen to continue to the next step in the Wizard.
Fields:
From Date – Enter the starting date to be used in searching for invoices that still have a tax liability.
Through Date – Enter the ending date to be used in searching for invoices that still have a tax liability.
Date Type – Select which date type is to be used for the search. The options are Invoice Date, G/L Date, and Payment Date.
Tax Type – Select the tax type for which the remaining liability is being calculated. This field dictates which tax amounts (State, County, City/Local) are being calculated against the percent referenced.
Tax Percentage – This dictates the tax percentage that should have been paid for all items on previously paid invoices that were flagged as taxable items (Apply Taxes).
Include Discounts – If selected, discount amounts will still be considered taxable. If cleared, they will not be used in the calculation.
Distribution Method – Select how the additional tax amounts calculated are to be charged to the general ledger.
- If Line Item is selected, the additional amounts will be charged to the same G/L accounts where the taxable invoice items were originally charged.
- If Organization is selected, the additional amounts will be charged to the Account selected in the Account field within the G/L Organization Set where the taxable invoice items were originally charged.
- If G/L Account is selected, the additional tax amounts will be charged to the G/L Account selected in the G/L Account field.
After the appropriate settings have been defined, click the Next button to continue on to the next step in the Wizard.
The application will pull together a list of the invoices where the tax amount remitted does not add up to the percentage defined in a previous step of the Wizard.
Using the check boxes in the first column, clear the check box for any invoices where the tax balance referenced should not or, does not need to be paid to the respective government agency. The invoice numbers in this list are hyperlinked. If clicked, an invoice inquiry will open.
Once this has been completed, click the Next button to continue to the next step in the Wizard.
The table will show the amounts to be charged to the respective G/L Accounts based on the distribution method selected. Click the Finish button. TheWizard will automatically create the invoice to remit these respective use tax liabilities. Click the Print button to print a listing of this information to myReports for review.
Note - If the Print button is used, the user will have to start over in the Wizard to actually create the invoice.
Select Purchase Order
The Select Purchase Order method of invoice entry is intended to be used when an invoice needs to be applied directly against a purchase order. The entry screen is divided up into two main sections. These two sections are the Header and the Purchase Order Item selection.
Fields:
The majority of the fields in the Header are the same as their counterparts on the full invoice entry screen with the following exceptions:
Purchase Order – Enter the purchase order number to be invoiced against. Once the purchase order is selected the Vendor and Description fields will populate based upon what was entered on the purchase order. The icon to the right of the field can be clicked to open a purchase order inquiry for the selected purchase order.
Note - If the Purchase Order field is left blank and the Vendor field populated first, the application will show all open purchase orders for the selected vendor.
Substitute Vendor P.O.’s – If selected, the application will allow the vendor to be changed from which the vendor the purchase order is attributed. This is typically used in situations where there is a blanket purchase order for something like office supplies that might be purchased from more than one vendor but, should still be applied against the individual blanket purchase order amount. Whether or, not this is allowed is dictated by the purchase order type settings.
In the Purchase Order Item Selection section of the entry screen, click the plus to the left of the purchase order to display all of the items on the purchase order. The purchase order number is a hyperlinked value that will open an inquiry pop-up for the selected purchase order. Use the check boxes to select which items should be brought into the invoice. Depending on the settings made in the Accounts Payable tab of Company FM Settings, the items will display either, just the original amounts entered for the item, or both the original amount and the amounts remaining in the second row for the item.
Once selected, the Description, Unit of Measure, Quantity, and Price per Unit fields all become editable for the respective items. These fields can be edited to dictate the amounts and quantities to be brought into the invoice being created. If allowed by the applicable purchase order type, the amount could be edited to exceed the amount of the purchase order. If the entire remaining amount for the item is being brought into the invoice or, if the remaining amount is not needed, make sure that the Completes Item check box is selected. If there are remaining amounts that might need to be invoiced at a later date, make sure that the Completes Item check box is cleared. The Completes Item check box will either default as selected or, cleared based on the setting established in the Accounts Payable tab of Company FM Settings.
Once the appropriate selections have been made in the Purchase Order Item Selection section of the entry screen, click the Accept button to add the invoice into the batch. By clicking the Cancel button, the screen willreset back to a fresh Select Purchase Order entry screen.
Select Shipper
The Select Shipper method of invoice entry can be used to enter invoices against Receipt of Goods shippers that have been created. If the shipper was entered against a purchase order, the invoice will appropriately unencumber funds against the purchase order, or complete the purchase order items as selected.
The Select Shipper invoice entry screen is divided up into two main sections, the Header and the Shipper Item Selection section.
The majority of the fields in the header have the same functionality as their counterparts in the other methods of invoice entry with the following exceptions:
From and To Receipt Date – These fields are located in the yellow bar at the top of the page. The application will only return shippers to be invoiced against those that fall within the date range specified on this tab. The dates default to a range from the current date of last year, to the current date. If the dates are changed, click the  icon to refresh.
Shipper – Enter the shipper number to be receipted against. Once the shipper is entered, the Vendor field will populate with the vendor that the shipper was entered against.
Note - If the Shipper field is left blank and the Vendor field populated first, the application will show all open shippers for the selected vendor.
G/L Account – For shippers that were not entered against purchase orders, the G/L Account field needs to be populated to dictate where to charge the items being added to the invoice. If the shipper was entered against a purchase order, the G/L distributions on the purchase order will be used and this field will not be applicable.
In the Shipper Item Selection section of the entry screen, click the plus to the left of the shipper to display all of the items on the shipper. The shipper number is a hyperlinked value that will open an inquiry pop-up for the selected shipper. If the shipper was entered against a purchase order, there will be an icon in the P.O. column that can be clicked to open a purchase order inquiry pop-up. Use the check boxes to select which items should be brought into the invoice. Once selected, the Description, Unit of Measure, Quantity, and Price per Unit fields all become editable for the respective items. These fields can be edited to dictate the amounts and quantities to be brought into the invoice that is created.
If the items were flagged to be completed when the shipper was entered, the Completes Item check box will automatically be selected. It can be cleared if necessary.
Once the appropriate selections have been made in the Shipper Item Selection section of the entry screen, click the Accept button to add the invoice to the batch. Or, click the Cancel button to reset back to a fresh Select Shipper Entry Screen.
Adding Notes
The notes feature provides a way of storing important narrative information related to an invoice. It can also be used to communicate this information to other users in the system. If a user sends a note to another user or, users, the note will appear in that user’s “myNotifications” section of the home page with a link to the invoice. A new note can be created by clicking the notes icon. Notes can also be accessed in invoice inquiry after the invoice batch is posted.
To add a note, click on the notes icon. A pop up will appear that will reflect any notes that have been added to the purchase order. To add a new note, click Add.
Fields:
Subject Line – Enter a title that briefly explains the note.
Message – Enter the body of the note.
Users – To forward the note to another user or, users, select the user(s) from the Selected Users box on the right side of the screen. The selected users will then receive the note in their “myNotifications” window on the Home Screen.
A Note notification on the Home Page
From there, the user can click on the Message hyperlink to see the invoice screen where they can view the rest of the invoice information.
Alternatively, the user can click on the notes icon to simply read the note itself. They will also have the option of replying to the note.
Attaching Documents
Microsoft Word and Excel files, PDFs, images and other types of documents can be attached as references. To attach a document, click the document icon  along the left side of the invoice entry screen.The following screen will appear:
To add or, attach a new document, click the New button.
In the Upload Document pop up screen, select the file type from the File Type drop down menu. The most common files types are .doc for Microsoft Word documents, .xls for Microsoft Excel, and .pdf for Adobe documents. Type a file description under the Description drop down menu. This description will be the document’s name in New World, but, does not have to be the same as its file name. Finally, under the file drop down menu, click Browse and select the file. Click OK to attach it.
Once the document is attached, it should be selected in to upload the document to the server and make it available to other users. With the document highlighted, click on the Check-In button then, click the OK button on the screen prompt to complete the process.
Once completed, close out of the document pop up by clicking on the Red X on the top right corner of the pop up.
The attached document will now appear in the document menu. To access, the document, click View to open the document. The system will open it.
Adding Remote Documents
Remote documents or, web links can also be attached to saved invoices. Click the remote documents icon along the left-hand side of the invoice entry screen.
Click the New button along the bottom of the remote documents list to open a fresh remote document entry screen.
In the remote document entry pop-up, enter a description for the web link. Enter the website address in the URL field. These remote documents will be available while the invoice is being processed through the workflow and inquiry. When the URL is clicked from the remote document list, a new browser window will open taking the user directly to that web page.
Workflow Processing
Once all the necessary invoices have been added to the invoice batch, it needs to be taken through the workflow to post the batch. This will make the invoices open which then would be eligible to be paid. The batch can be processed from the Invoice Batch List.
Navigate into the Validation tab.
Select the batch or, batches to be validated using the check boxes in the first column of the list. Click the Submit button. If any errors are returned, the batches can be opened by clicking on the batch number. From there the invoices can be opened and corrections can be made.
Navigate into the Print Edit and Error Listing tab.
Select the batch or, batches to include in the edit and error listings using the check boxes in the first column. Before clicking the Submit button, click Show Preferences in the upper right-hand corner of the screen to define the desired output preferences for the edit listing. Click the Submit button to send the edit and error listings to myReports. The reports can then be reviewed from the user’s myReports list to check for errors.
Navigate into the Approval tab.
Select the batch or, batches to be approved using the check boxes in the first column then click the Submit button. Depending on the approval structure set up in the Process Manager for the process of Accounts Payable – Invoice Entry, multiple approvals may be necessary before the batch is fully approved and eligible to continue in the workflow.
Note - If the batch had any invoices selected for manual checks, the user needs to navigate back to the Invoice Batch List and create the manual payment register for the batch. After creating the manual payment register for the batch, the user needs to navigate into the payment batches stage of the workflow where checks, ACH files, and positive pay files can be created. After the checks have been printed for a batch containing manual check invoices, the batch will be eligible to be posted. Not before.
Navigate into the  Post tab of the workflow.
Select the batch or, batches to be posted using the check boxes in the first column. Before clicking the Submit button, click Show Preferences in the upper right-hand corner of the screen to define the desired output preferences for the post listing. Click the Submit button to simultaneously post the batch, send the system generated journal to the journal list, and make the invoices contained within the posted batches open invoices eligible to be paid through the invoice payment process.
Accounts Payable Invoice Payment
Financial Management>Accounts Payable>Invoice Payment Batches
The second half of the accounts payable process is the invoice payment process. This process is started from the Invoice Payment Batch List.
The Invoice Payment Batch List shows all invoice payment batches that are currently open, and allows users to create new batches in which to pay invoices. Each row in the list represents a unique invoice payment batch. The batches that a user has ability to view is determined by the departments the user is authorized for, in the process of Accounts Payable – Invoice Payment in the Process Manager, and also, by the Supervisor check box for the Accounts Payable Sub-ledger in User Based Security. If the user has Supervisor rights, they will be able to see all open batches for the departments for which they are authorized. If not, the user will only be able to see the batches they have created.
In the list, the user can see where the batch is at in the workflow using the various columns of information.
Buttons:
New – Click to open a fresh invoice payment batch entry screen.
Delete – Click to delete the selected invoice payment batch.
Refresh – Click to refresh the list to make sure the user is viewing the most up to date list of invoice payment batches.
Creating an Invoice Payment Batch
Click the New button along the lower left-hand corner of the invoice payment batch list to open a fresh invoice payment batch entry screen.
Fields:
Department – The user’s home department will default into the department field. If the user has the authority to create invoice payment batches on behalf of multiple departments, the other departments can be selected from the drop-down. The department that the batch is attributed to dictates to which department’s approval structure the batch will be subject. The departments a user has access to pulls from the Accounts Payable – Invoice Payment process in the Process Manager.
Bank Account – Select the bank account that invoices are to be paid from. The bank account dictates which invoices are available to be selected for payment within the batch as the invoices are attributed to a bank account when entered. The bank accounts that are available for selection in the drop-down are controlled by User Based Security.
Starting Check Number – The starting check number will automatically pick up where the last batch left off, but, it can be changed if necessary.
Check Date – The check date will automatically populate with today’s date but, can be changed if necessary.
Buttons:
Save – Click to save and create the invoice payment batch.
Save/New – Click to save and create the payment batch. A fresh Invoice Payment Batch Entry screen will come up. This would typically only be used if multiple invoice payment batches needed to be created within any one invoice payment batch.
Delete – Click to delete the selected invoice payment batch. If the create payment register stage of the workflow has already been performed, then the payment batch at the payment batch stage of the workflow must be deleted before the invoice payment batch can be deleted.
Reset – Click to reset the fields on the invoice payment batch to exactly as they were as of the last save.
Once the fields for the invoice payment batch have been populated appropriately, and the batch has been saved and created, the list of invoices to be paid or, voided will appear beneath the batch settings.
Buttons:
Add – Click to open the select invoices for payment screen where invoices can either be selected to be paid or, voided.
Remove – Click to remove the currently selected invoice from the list.
Refresh – Click to refresh the list to make sure the user is viewing the most up to date listing of invoices to be paid or, voided within the batch.
After clicking the Add button the following screen is displayed:
The Select Invoices For Payment screen has multiple criteria available to search for, or isolate certain invoices to be paid. The primary selection criteria are the From Due Date and To Due Date range. Results can also be narrowed down by Department, Vendor, and/or One-Time Payee.
Buttons:
Search – Click to search based on the defined criteria.
Add All – Click to automatically add all invoices that match the search criteria to the invoice payment batch.
Reset – Click to reset the search criteria.
After clicking the search button, the list of results will be displayed.
Within the list, users can click the S icon in the first column to select an invoice to be paid or, click the V icon in the first column to select an invoice to be voided. There is a Select All button available along the bottom of the list to select all of the invoices in the list to be paid within the batch. The list will also display the void date and the reason for the void for any invoices that were selected to be voided. If any invoices currently have a hold payment reason assigned, it will be displayed in the column. The invoice number is a hyperlinked value that allows the user to open the invoice and edit the fields that are non-fiscal in nature. Next save those changes. This is how hold payment reasons can be added or, removed. This also, is how check sort groups and check codes can be added.
If any invoices are selected to be voided, the following pop-up will be displayed:
From the pop-up, the user can select the G/L Date the void transaction should be attributed to. The user can also select the Void Action. If the invoice originated with a purchase order, this gives the user the option to reestablish the purchase order or, not. The last field is the void Reason which is populated by Validation Set # 349.
After selecting the desired invoices to be paid or, voided, the user can click the Submit button to update the invoice payment batch based on the selections. After clicking submit, the user can redefine the search criteria to bring other invoices into the batch or, they can bread crumb back to the invoice payment batch to verify the selections.
Use the bread crumb link to return to the Invoice Payment Batch. If everything appears correct, the user can use the bread crumb link to return to the Invoice Payment Batch List to process the batch.
Workflow Processing
Invoice payment batches are processed from the Invoice Payment Batch List where the batch or, batches can be taken through each step of the workflow.
Navigate into the validation stage of the workflow (check mark icon) by clicking on the respective icon.
Select the Invoice Payment Batch to be validated using the check box in the first column. Click the Submit button to submit the batch for validation. If any errors are returned, the batch can be opened by clicking on the bank account hyperlink in the list. Changes can then be made as necessary to the batch.
Navigate to the Print Edit and Error Listing tab of the workflow.
Select the batch or, batches to include in the Edit and Error Listings using the check boxes in the first column. Before clicking the Submit button, click Show Preferences in the upper-right hand corner of the screen, to define the desired output preferences for the edit listing. Click the Submit button to send the Edit and Error Listings to myReports. The reports can then be reviewed from the user’s myReports list to check for errors.
Navigate to the Approval tab of the workflow.
Select the batch or, batches to be approved using the check boxes in the first column. Next click the Submit button. Depending on the set up of the approval structure in Process Manager for the Accounts Payable – Invoice Payment process, multiple approvals may be necessary before the batch is fully approved and eligible to continue on in the workflow.
Navigate to the  Create Payment Register tab of the workflow.
Select the batch to create the payment register by using the check box in the first column. Before clicking the Submit button, click Show Preferences in the upper-right hand corner of the screen to define the desired output preferences for the payment register. Click the Submit button to send the payment register to myReports. The reports can then be reviewed from the users’ myReports list. The creation of the payment register creates the payment batch worked with in the next stage of the workflow.
Navigate to the  Payment Batches tab of the workflow.
There are a number of options available from the Payment Batches stage of the workflow. Users can click on the bank account to inquire on the details behind all of the payments in the batch.
Buttons:
Delete – Click to delete the payment batch. It might be necessary to delete a payment batch if additional check codes need to be added to invoices. Separate checks can be created for multiple invoices or, the same vendor being paid within a single payment batch.
Refresh – Click to refresh the payment batch list to ensure the user is viewing the most current listing of payment batches, along with their status.
Print – Click to open the print payments pop-up which is used to send the check file to myReports.
Fields:
Select to Print – Select to print either Checks or, EFTs. If there are EFT payments within the batch, the EFT stubs must be printed (sent to myReports) before the batch will be eligible to be posted.
Print All Checks – If selected, all checks in the batch will be printed. If cleared, the from and to range of check numbers to be printed needs to be defined.
Override Check Format – Select if a printed check format needs to be used for this batch that is different from the default for the bank account.
Check Message – The text in the check message text field will print on the stub for all checks in the batch. The text field can be populated by selecting a standard message from the drop-down or, by typing directly into the field below the drop-down.
Once the appropriate settings have been defined in the print payments pop-up, click the OK button to send the check file to myReports where it can then be sent to the check printer.
Renumber – Click to renumber the check numbers assigned to the payments in the batch. This is only used if the organization is using preprinted check stock. If the check stock gets jammed in the printer, and a range of check stock is ruined, the payments in the batch need to be renumbered to the next available range of valid check stock. This is unnecessary if the organization is using blank check stock. The following pop-up will be displayed when this button is clicked:
ACH – Click to generate the ACH file for a payment batch containing EFT payments. The ACH file will be sent to myReports where it can then be downloaded. After downloading the ACH file, it needs to be uploaded to the bank through the bank’s interface. The Create ACH Transmittal file page will be displayed when the button is clicked.
Fields:
Export Type – Select the appropriate export type. The options in the drop-down are pulled from Validation Set # 45.
ACH Transaction Date – Defaults to the current date, but, can be changed if necessary.
Include Offsetting ACH Entries – Select if the names of offsetting entries should be included in the transmittal file.
Print ACH Transmittal Report – Select to send the ACH Transmittal Report to myReports along with the ACH file.
ACH Name – If the ACH Name field was populated in the Company Tab of the Company Suite Settings page, it will default to it. If not, the name can be typed in the field.
Immediate Origin Type – If the field was populated in the Company Tab of the Company Suite Settings page, it will default in. Otherwise, select how the organization will be identified in the ACH file. Federal Tax ID would be one example. The values are determined by the rules governing ACH files.
Immediate Origin – If the field was populated in the Company Tab of the Company Suite Settings page, it will default in. Otherwise, enter the number for the type specified in the Immediate Origin Type field. For example, if the Immediate Origin Type is Federal Tax ID, then the Federal Tax ID number would be entered here.
Originating Bank
ACH Name – The name should populate automatically from the ACH name specified for the bank account being used.
Routing Number – The routing number should populate automatically from the routing number specified for the bank account being used.
After the appropriate transmittal file settings are established, click the Create button to send the ACH file to myReports.
Positive Pay – Click to generate the Positive Pay file for the payment batch. The Create Positive Pay File pop-up will display.
The following fields are available in the Create Positive Pay File pop-up:
Export File Type – Select the appropriate positive pay format from the options in the drop-down. The options in the drop-down are pulled from Validation Set # 32.
Include Cash G/L Distribution Information – Select if cash G/L Account distributions should be represented in the file.
Include EFT Transaction Types – Select if EFT/ACH payments should be represented in the Positive Pay file.
Once the appropriate settings have been defined, click the OK button to send the Positive Pay file to myReports where it can be downloaded.
Email Confirmations – Using this screen, emails can be sent to vendors notifying them that a payment is on the way.
The following settings are available in the Email Payment Confirmations pop–up:
Payment Type – Select Checks, EFTs, or Both.
Email Address – Select to populate the list with all of the payments in the batch. This is intended only for the payments for vendors that already have an email address set up on their master file.
After these two fields are defined, click the Search button to populate the list of payments. Select the payments from the list, then fill out the Sender, Subject, Message, and Include sections of the screen. When complete, click either the Email button, Email and Listing, or Listing only.
Register – Click to open the payment batch register pop-up where the register can be recreated for the batch.
Fields:
Title – Enter a brief title for the payment batch.
Include Detail Transactions – Check this box if the invoices being paid by each payment should be listed in the register.
Print Cash Requirement Listing – Check this box to also send the Cash Requirement Listing to myReports.
Once these fields have been defined, click the OK button to send the payment batch register to myReports.
Once Check and EFT payments have been printed, and ACH files and Positive Pay files have been created (if necessary), the batch is now ready to be posted. Users can verify that these outputs have been generated by the corresponding icons in the ACH, Positive Pay, Checks, and Printed columns.
Navigate into the Post tab of the workflow.
Select the batch or, batches to be posted using the check boxes in the first column. Before clicking the Submit button, click Show Preferences in the upper-right hand corner of the screen to define the desired output preferences for the post listing. Click the Submit button to simultaneously post the batch, send the system generated journal to the journal list, and update the status of the invoices selected within the batch to either paid or, void.
Accounts Payable Reports
Accounts Payable (AP) Reports can be found by navigating to Financial Management > Reports > Accounts Payable.
Accounts Payable Invoice Report
The Accounts Payable Invoice Report is the most general of the AP reports. It allows users to isolate AP Invoices based on date, status, department, and bank account criteria. The report can be run in summary for header information or, detail to include item information.
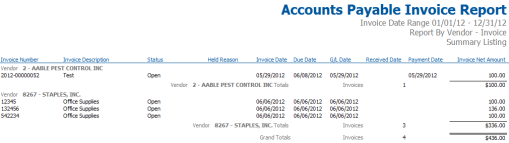
Accounts Payable Invoice Report
Accounts Payable Invoice Aging Report
The Accounts Payable Invoice Aging Report organizes open invoices by due date. The report can also be run by the accounts payable liability account that the invoices are attributed to. Both departments and bank accounts are also available as selection criteria.
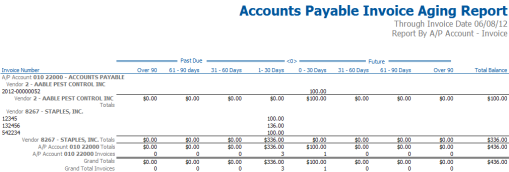
Accounts Payable Invoice Aging Report
Accounts Payable by G/L Distribution Report
The Accounts Payable by G/L Distribution Report shows which AP invoices are attributed to which G/L Accounts. The report is primarily sorted by G/L Account.
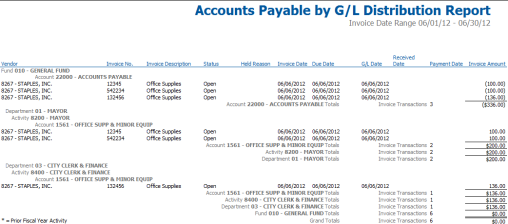
Accounts Payable by G/L Distribution Report
Accounts Payable Budget to Actual Report
The Accounts Payable Budget to Actual Report shows how un-posted AP invoices affect budget availability for the G/L Accounts they are attributed to.
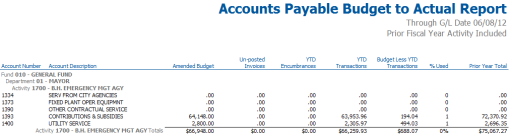
Accounts Payable Budget to Actual Report
Accounts Payable Variance Report
The Accounts Payable Variance Report helps highlight material differences that exist between AP invoices and the purchase orders they were entered against.
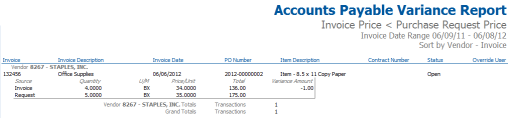
Accounts Payable Variance Report
Accounts Payable 1099 Activity Report
The Accounts Payable 1099 Activity Report shows a summary of 1099 activity attributed to vendors within the selected date range.
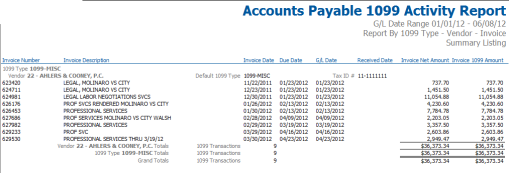
Accounts Payable 1099 Activity Report
Item Transaction Report
The Item Transaction Report shows the detail of transactions attributed to procurement items. This can give the user a better idea of how much is being spent on particular items and where it is being spent.
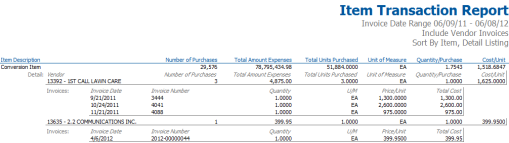
Item Transaction Report
Item Analysis Report
The Item Analysis Report shows very high level item based information. Highlighting how much was spend on each item, the number of units purchased, the average price per unit and the average number of units per purchase.

Item Analysis Report
Vendor Invoice Summary
The Vendor Invoice Summary shows how much has being spent with vendors within the selected date range.
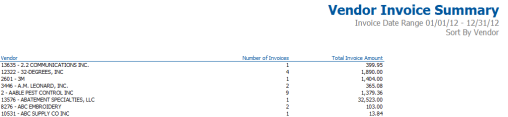
Vendor Invoice Summary